Configuring Your Company’s Airport Settings
Establishing and Managing Airports in Limo Anywhere
Limo Anywhere comes with most United States commercial airports established in the system (The Airports initially loaded in the system are marked as ‘INACTIVE‘ by default).
- Click on the ‘My Office’ icon on the toolbar.
- Open the ‘Company Resources’
- Select the ‘Airports’ button as illustrated below.
- To activate an Airport select it from the list and click ‘EDIT AIRPORT’.
- The prepopulated airport code should never be changed.
- NOTE: Airport codes are used throughout the travel industry and are universally accepted. In addition, in Limo Anywhere they are used to define Zones for the company’s fixed rate structure.
- The State the Airport is in can be populated from the drop-down list.
- NOTE: This is optional. Using the State can be helpful especially if the company serves across state lines and tax rates are set up for Pick Up/Drop of locations in that State.
- The Airport can be either LOCAL (default) or NON-LOCAL.
- If the Airport is to be ACTIVE change the Status on the drop-down list from the NON-ACTIVE (default).
Adding an Airport to Limo Anywhere
- In the ‘Add Airport‘ box:
- Enter the Airport Code.
- Enter the Description
- The description is usually the full name of the Airport.
- Select the State/Province from the drop-down list.
- Select LOCAL/NON-LOCAL in Local?
- Select ACTIVE/INACTIVE in Status.
- Click ‘ADD NEW AIRPORT‘ to save any data entered.
Create and Manage Airport Pick-Up Instructions
- To Add Pick-Up Instructions
- Click on the ‘My Office’ icon in the toolbar.
- Open the ‘Company Resources’
- Select the ‘Airports’
- Select an Airport from the ‘Airports’
- Click the ‘Edit Airport’
- Enter a ‘Short Title’ (20 characters maximum).
- Enter the ‘Instructions’.
- Select the ‘Dflt’ check box to make these the default instructions.
- Keep the ‘Status’ set to ‘ACTIVE’.
- Click the ‘ADD’ button to save what was entered.
- To Edit Pick-Up Instructions
- Select the Airport from the ‘Airports’ list that you wish to change the instructions on.
- Click the ‘Edit Airport’
- Select the instructions from the ‘Stored Pick-up Instructions’
- Click the ‘EDIT’
- Modify the ‘Short Title’, ‘Instructions’, ‘Dflt’ and/or ‘Status’ fields as needed.
- Click the ‘UPDATE’
Setting Up Airport Meet Pricing in Limo Anywhere
Depending on your customers’ needs and the airports in service area, you may want to set up different fees associated with curbside and inside pickups. To setup your Airport Meet options follow these steps:
- Click on the ‘My Office’
- Click on the ‘Company Preferences’
- Click on the ‘Reservations’
- Scroll down to the Pickup Fee section.
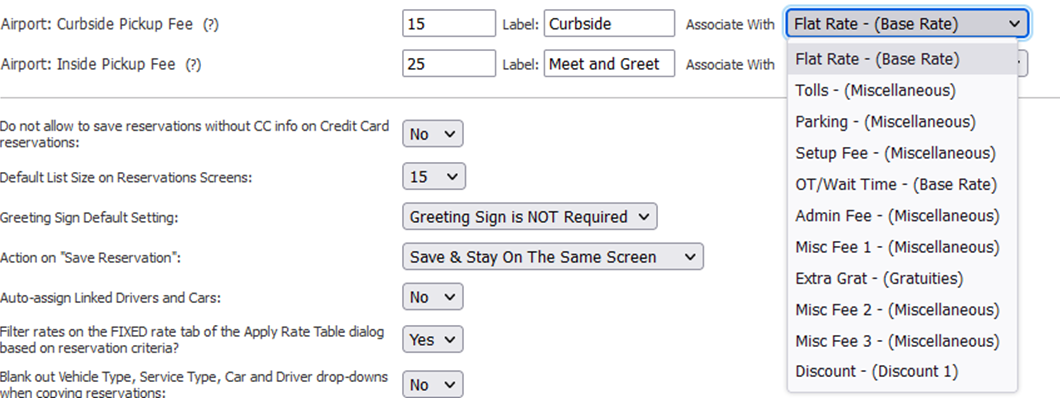
- Update your pricing, label, and the rate line item you want these fees to be associated with when the rate is applied.
- If you don’t have an existing rate line item you want to use for your Airport Meet option, you can create the desired fixed rate line item in the System Rate Manager
- Click on the ‘My Office’ icon in the toolbar.
- Select the ‘Rate Management’ tab.
- If you don’t have an existing rate line item you want to use for your Airport Meet option, you can create the desired fixed rate line item in the System Rate Manager
- Select the ‘System Rate Manager’ button.
-
- Open ‘System Rate Manager’.
- Select the ‘Fixed Rate’, ‘Multiplier Rate’, or ‘Percentage Rate’
- Select the proper ‘Rate Group’.
- Enter the ‘Rate Name’.
- Add the ‘Default Amount’ ONLY if you need the rate to apply to all customers, no matter the trip type.
- Remove the check on the box labeled ‘Primary Rate’ if you would like this rate field to be stored on the ‘Secondary Tab’ in reservations/settlement screen.
- Click the ‘Save’ button.
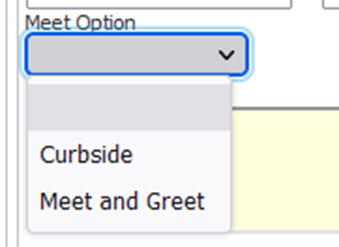
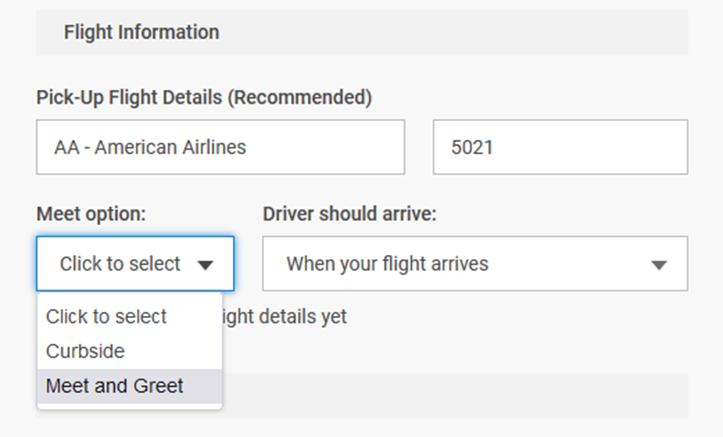
Your Label can be updated to reflect what your company prefers to call these various services (ex. Baggage or Meet and Greet as opposed to Inside).
How the Label appears in the Back Office:

How the Label appears in ORES: -
Recent Posts

Digital Advertising That Drives Bookings: A Smarter Strategy for Chauffeur & Limo Operators
Monday February 9, 2026
Be Ready for Anything: Emergency Preparedness with Limo Anywhere
Friday January 30, 2026