Managing Company Aliases
The Company Alias module allows you to operate under multiple names within a single Limo Anywhere system. This will also allow you to track reservations by their source, process payments using different payment gateways, and run separate reports for each alias.
Is an Alias Right For You?
If you are an operator with two locations in the same area that share the same resources, such as fleet, using a company alias may be more beneficial for you.
If you are an operator in multiple locations or entirely separate business that does not share resources (ex. having bases in New York City and Los Angeles), it will likely be easier for you to operate under separate Limo Anywhere subscriptions and treat your different locations as separate entities.
Adding a Company Alias
Note: Company Alias is a premium module and needs to be purchased before you can access its functionality. The cost of the Company Alias module is a one-time fee of $49.00 and then a recurring fee of $49.00 each month.
- Click on the ‘My Office‘.
- Select the ‘Company Settings‘ tab.
- Click the ‘Contact Information‘ button.
- Click on the ‘Manage Company Aliases‘ hyperlink.
- Enter the ‘Company Alias‘. Your customer will not see the alias name.
- Enter the ‘Company Name‘, ‘Street Address‘, ‘Street Address 2‘ (if applicable), ‘City/Town‘, ‘State/Province/Territory‘, and ‘Zip/Postal Code‘.
- (optional step) Enter the ‘EIN/Business Number‘.
- Enter the ‘Country‘, ‘Primary Phone Number‘, ‘Secondary Phone Number‘, ‘Fax Number‘, ‘General Email Address‘, ‘Trips Email Address‘, ‘Quote Email Address‘, ‘Billing Email Address‘, ‘Company Website URL‘, ‘Default Gateway‘ and ‘Default Currency‘.
- Select The ‘Use Online Reservation for this Alias‘ check box if you have a website for this company.
- Click the ‘Add Alias‘ button.
- When ‘Use Online Reservation for this Alias‘ Check Box is selected upon initial Alias creation, a call to technical support is necessary to activate the Online Reservation System for the New Alias.
Setting Up ORES For Different Aliases
- Click on the ‘My Office‘.
- Select the ‘Company Settings‘ tab.
- Click ‘ORES & Mobile’
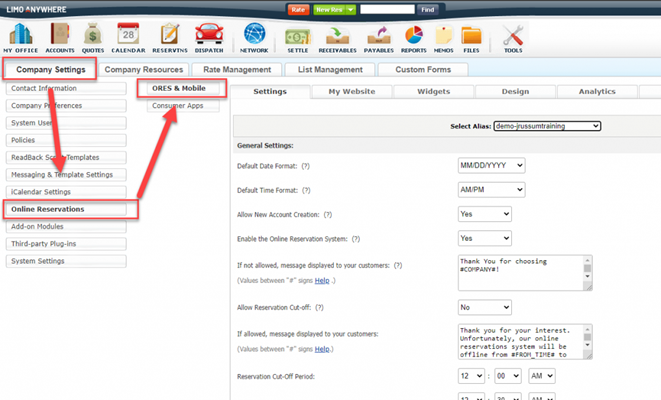
When making changes on each tab, make sure you have the correct alias selected. Each alias can have their own Settings, My Website, Widgets, Design, Analytics, and Rules. Under the My Website tab you will find a different code and URL link for each alias.
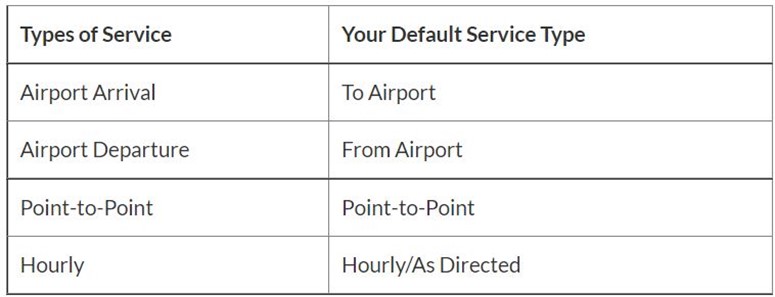
Configure Service Types for Aliases
In order for Limo Anywhere, the Online Reservation System, Passenger App, and Driver Anywhere to communicate and work correctly with each other you need to configure your default Service Types. Below are the four types of service which are used as a foundation for the booking tools:
- Airport Arrival
- Airport Departure
- Point-to-Point
- Hourly
You have full control over the service types you offer, allowing you to create and edit service type names at any point. Limo Anywhere needs to identify a default service type to use in all four of those situations. Below is a chart of the four types of service and their initial default service types. You can have many service types, but make sure you have one of them set to be used as a default for each of the four situations. This is required for the booking tools to properly price trips.
Set System Default Service Types
Click on ‘My Office’ icon.
- Click on ‘Company Settings’ tab.
- click on ‘System Settings’ button.
- Click on ‘Service Types’ button.
- Choose the appropriate alias from the ‘CompanyAlias’ drop-down.
- Click on each Service Type.
- Select your Pricing Type for that service type.
- You can create different rate matrices to use for your service types in different aliases, ex. you may choose to create a fixed-rate wedding package for one of your aliases while charging hourly in another.
- When creating new rate matrices, you can also assign different pricing models to different vehicles in your separate aliases.
- Assign the correct Service Type in Default Mapping.
- Slide the Visible in ORES 4 slider to the right to make the service type active for the online reservation system.
- Type in your Custom Label Name. (this is what your customers will see when booking online)
- Click Save to make sure changes are saved.
- Repeat for each alias.
As always, if you have questions or need further assistance, please reach out to Support at 1-888-888-0302 x2.
Recent Posts

Digital Advertising That Drives Bookings: A Smarter Strategy for Chauffeur & Limo Operators
Monday February 9, 2026
Be Ready for Anything: Emergency Preparedness with Limo Anywhere
Friday January 30, 2026