Creating Account-Specific Scheduled Messaging Template

With Limo Anywhere's scheduled messaging templates, operators can easily create custom messages that are sent automatically based on specific trip statuses. Depending on your clients’ exact needs you can also create account-specific scheduled messages. This saves time and ensures that important information is delivered quickly and accurately to your bookers, billers, or passengers (and any combination of the three). In this blog, we'll explore the benefits of using account-specific scheduled messages in Limo Anywhere, how to create and customize them to fit your unique business needs and provide some examples of common use cases for these powerful tools.
Creating Scheduled Messaging Templates
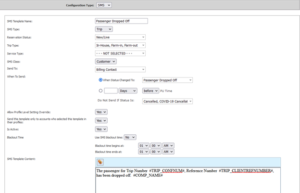
- Navigate to My Office > Company Settings > Messaging & Template Settings > Scheduled Messaging
- Choose Email or SMS from the Configuration Type drop-down menu.
- Click ‘Add New Template’
- Enter a name for your template in the Email or SMS Template Name Field
- Select ‘Trip’ from the Type drop-down menu (you can also create scheduled messaging related to invoices, but the use cases we’ll be covering in this blog will all relate to New/Live trips
- Select ‘New/Live’ from the Reservation Status drop-down menu.
- Choose ‘Select All’ from the Trip Type drop-down menu.
- Choose ‘Select All’ from the Service Type drop-down menu.
- If you would like to create a scheduled message related to a specific service, you can select just the specific service. Ex. Select ‘Prom’ if you are created a scheduled message that goes to all appropriate parties when the status changes to ‘Passenger Dropped Off’
- Select ‘Customer’ from the Email or SMS Class drop-down menu.
- Choose ‘Select All’ or select whether this template should be sent to the Billing Contact, Passenger, and/or Booking Contact. For example, you might have a booker who is notified via text when the status has changed to ‘Passenger on Board’, or maybe you have a Billing Contact who would like an email when a trip’s status changes to ‘No Show’ or ‘Late Cancel’
- Set your desired criteria in the When To Send Field, you can choose to associate the message with a status or statuses, or you can choose a certain timeframe (days, hours, or minutes) either before or after a trip that you wish to send a notification. For example, you might offer a standard notification 24 hours before a trip, but you might have a Passenger who prefers a separate reminder 7 days prior to any upcoming trip.
- You can also choose additional criteria for when a message should not be sent (ex. Cancelled, COVID-19 Cancellation).
- Choose ‘Yes’ or ‘No’ from the Allow Profile Level Setting Override based on your company’s preference.
- Choose ‘Yes’ from the drop-down menu that only sends templates to accounts that have selected this template in their profile. This is the setting that allows you to send account-specific scheduled messaging rather than globally applying a notification.
- Make sure the Is Active setting is set to ‘Yes’ (or you can set to ‘No’ if you would prefer to deactivate a template without deleting it from your system)
- (Optional) For SMS notifications, choose whether you would prefer to set a blackout period during which text notifications won’t be sent.
- Configure your template content in the text field below. Click the button to access the appropriate HTML trip tags (ex. The passenger for Trip Number #TRIP_CONFNUM#, Reference Number #TRIP_CLIENTREFNUMBER#, has been dropped off.)
Assigning Account-Specific Templates
- Search for the desired account in your system.
- Select the contact and click ‘Edit’
- Once the account is open, navigate to the Misc Tab

- Choose the desired templates from the ‘Scheduled Email Rules for Account’ drop-down (only templates where you specified ‘Yes’ in Step 13 in the list above will be available in this drop-down)

5. Click ‘Save’
Recent Posts

How Black Car Operators Can Win More Corporate Accounts with Digital Marketing
Wednesday March 11, 2026
Digital Advertising That Drives Bookings
Wednesday March 11, 2026