Utilizing Account Priority in Limo Anywhere

While we know that operators treat all of their clients like they are VIPs, we also recognize that some clients may have additional expectations when it comes to amenities and services. Using the Account Priority setting in Limo Anywhere can help to draw attention to these clients in your dispatch grid and in your reporting.
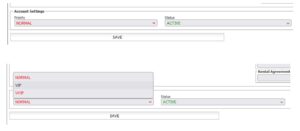
There are three priority levels available: Normal, VIP, and VVIP. How these are defined internally is at the discretion of your company, but you might consider using VIP for someone who has a preference towards a specific chauffeur or vehicle in your fleet and VVIP to determine someone who has special requests when they travel (ex. you might offer bottled water as a standard offer, but you might have a client who travels early morning who would like to be met with their favorite coffee order).
Setting Account Priority
When you are setting up a new account, you can select the Priority Level at the time of account creation. You can also edit an existing account by searching for the account (by name, company, account number, etc.), clicking the ‘Edit’ button, selecting the appropriate Priority from the dropdown menu, and then clicking ‘Save’ when you are done.
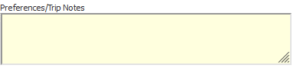
Any notes related to the account’s priority level can be added to the Preferences/Trip Notes field (this is a separate notes field from the Trip Notes available at the Reservations level)
Priority Status on the Dispatch Grid.
- Within the Dispatch Grid, click ‘Grid Setup’

- Under the Grid Setup tab, make sure that box for ‘Passenger Priority Level & Notes’ is ticked

- To highlight VIP/VVIP Passenger Status, navigate to the My Prefs tab, scroll to the appropriate selecting, select ‘Yes’ from the dropdown menu and then select your desired highlight color.

- Click ‘Update Dispatch Grid Fields’ to save changes.
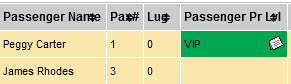
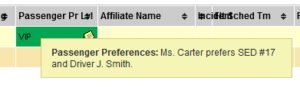
- In your Dispatch Grid, you will now see your VIP and VVIP clients highlighted in the color you chose. If there are any notes on the account, you will also see a notepad icon that can be hovered. Vip
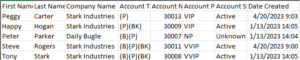
 Exporting a list of your VIP and VVIP Clients
- Click Accounts > Export Customers
- If you are looking to run a complete list of clients, make sure that the box for ‘Include All Dates’ is ticked, otherwise choose the date range for Reservations you are looking for (ex. maybe you only want to run a list of account who have booked sometime within the last year).
- Check ‘Include All Fields’ or choose the individual fields you would like included on the report (ex. First Name, Last Name, Email Addresses, Account Priority).
- (Optional) check the ‘Date Created’ option, this will allow you to easily identify when an account was created so that you can identify new accounts vs. older accounts.
- Under the ‘Accounts that are:’ option, choose the appropriate radio button (Active, Inactive, Both).
- Click ‘Generate Export File’
Recent Posts

GroundXchange: A Smarter Affiliate Opportunity for Limo Anywhere Operators
Wednesday May 6, 2026
Creating and Applying Account Credits in Limo Anywhere
Thursday April 30, 2026