Utilizing Reservation Manifests

As we navigate the digital landscape of 2023 where technological hiccups can occur unexpectedly, it's crucial to prioritize preemptive actions. By establishing redundancies in your business, you create an additional layer of protection that ensures uninterrupted access and smooth operations. When an interruption arises, having these backups in place allows for swift recovery, reducing any potential downtime and minimizing the impact on your limo business. One such redundancy that you can employ within Limo Anywhere is ensuring that your Reservation Manifest Reports are emailed to you regularly.
Scheduling Email Reservation Manifests
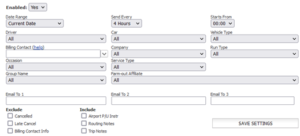
- Navigate to My Office > Company Settings > Messaging & Template Settings > Email Res Manifest
- Set the ‘Enabled’ dropdown to ‘Yes’.
- Choose your desired date range from the Date Range dropdown (ex. Current Date, Current Date +1 Day, Current Date +2 Days)
- Select how frequently you would like to receive your Reservation Manifest Reports from the ‘Send Every’ dropdown. The available frequencies are 2 Hours, 4 Hours, 6 Hours, 8 Hours, 12 Hours, and 24 Hours (the appropriate frequency for your business will vary based on trip volume and size of your operation, but we recommend having this report mailed to you every 2 to 4 Hours)
- Select the time you want included in the ‘Starts From’ dropdown.
- Confirm all other dropdown filters are set to ‘All’.
- Select which items you would like to Exclude or Include.
- Enter the email addresses that you would like to have receive the Reservation Manifest Reports. The reports can be emailed to up to three different accounts (ex. reservations@companydomain.com, info@companydomain.com, etc.)
- Click the ‘Save Settings’ button to apply the selected settings.
While we recommend scheduling your Reservation Manifest to be emailed automatically, you can also generate a reservation manifest manually if the need arises (ex. you are expecting inclement weather that may impact your connect to the Internet, your ISP has scheduled network maintenance, etc.)
Manually Generate a Reservation Manifest
- Click “Reports’ and navigate to the ‘Reservation Manifest’ report creation box.
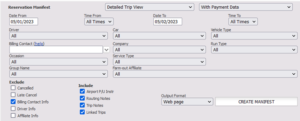
- Select either ‘Detailed View’ or ‘Summary View’ from the dropdown.
- Select either ‘With Payment Data’ or ‘Without Payment Data’ from the dropdown to determine if customer payment data will be included on the report.
- Select the ‘Date From’ and ‘Date To’ that is appropriate for the days to be included on the manifest.
- (OPTIONAL) Select the ‘Time From’ and ‘Time To’ to narrow the time period that the manifest will be produced for.
- Select which items you would like to Exclude or Include from the report.
- Select the the desired format from the ‘Output Format’ dropdown. The options include ‘Web Page’, ‘Send Email’, ‘Excel-Standard’, and ‘Excel-Inline’. Note: Excel-Standard mirrors the layout found on the ‘Web Page’ format, Excel-Inline converts a reservation to a single row with the appropriate data broken down into relevant columns (ex. Pick-up Date, Pick-up Time, Service Type, PU Location, etc.)
- Click ‘CREATE MANIFEST’ to generate the report. Repeat the steps above for each report you wish to generate manually.
Recent Posts

A More Proactive Way to Manage Driver and Affiliate Compliance
Wednesday July 22, 2026