Managing Account Settings in your Company Preferences

When it comes to managing your operation, there's no one-size-fits-all solution. Whether it's utilizing unique scheduled messaging, customizing your service types, or even fine-tuning account settings -- your business is unique, and your tools should reflect that. Did you know that you have the power to not only customize how account numbers are assigned in your system but also the specific information you need when setting up new accounts? In this blog we’ll guide you through how to set up custom account numbering as well as guide you through the steps to require specific account information during setup.
Accessing Account Number Settings
- Click the “My Office” icon in the Navigation Bar.
- Select “Company Preferences” from the Company Settings tab, then click the “Accounts, Calendar, Quotes” button from the lefthand menu.
There are two options available under the “Customer Account Numbers:” field: System Generated or Manually Entered.
By default, the system is set to “System Generated” and “Begin at 30000”, but your system can start with any number you prefer. System Generated numbers means anytime a new account is created Limo Anywhere will assign the next available account number (ex. 30000, 30001, 30002…, etc.)
Note: If you choose the “System Generated” option, you are only allowed to enter numerical values in the “Starts With:” field in order for the system to create numbers in sequence.
Choosing the “Manually Entered” will require the account number be entered by the person setting up the account each time a new account is created. Manually entered account numbers can be a numerical, text, or a combination of both.
[Optional] if you’re choosing to generate your own account numbers, you can choose to allow duplicate account numbers. This would allow multiple passengers, booking contacts, and billing contacts to be assigned the same account number this linking those persons with that account number for the purpose of invoicing or reporting.
Note: These settings impact your system globally, but this setting can be adjusted at any time. For example, if you prefer to use system generated accounts for your retail clients but prefer to use a manual format when generating account numbers for corporate clients, you can always adjust this setting while creating an account you want to use a manually entered value for and then return the setting back once the account has been created.

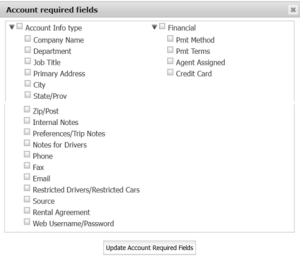
Setting Required Account Fields
Before adding accounts, you are able to define what fields in the Account Profile are required before the Account can be saved.
- Click the “My Office” icon in the Navigation Bar.
- Select “Company Preferences” from the Company Settings tab, then click the “Accounts, Calendar, Quotes” button from the lefthand menu.
- Click the “Required account fields” link.
- Information is broken up into two categories, Account Info type and Financial.
- Tick the boxes for each of the pieces of information you want to require when an account is created.
- Click the “Update Account Required Fields” button to save changes.
For example, when setting up a new account, you might want to require that every contact requires a phone number and an email, or maybe you want to ensure that each account is created with a valid form of payment, you can select “Pmt Method”.
Note: this setting is also global, so you may not want to require a Company Name unless you do almost exclusively corporate work.
If you ever have questions, need assistance, or encounter challenges, our dedicated Support team is always ready to assist you. You can reach Support directly by calling 1-888-888-0302 x2 or sending an email to support@limoanywhere.com. Do you have a product suggestion or feedback about something in our system? Send an email to the Product Team at productteam@limoanywhere.com; our team wants to hear from users like you!
Recent Posts

How Black Car Operators Can Win More Corporate Accounts With Digital Marketing
Tuesday June 16, 2026
New Integrations and Workflow Improvements to Help Operators Move Faster
Monday June 8, 2026