Utilizing LA Pay’s Request payments Feature
In today's digital age, data privacy is crucial. Offering a secure payment solution provides clients with peace of mind when submitting payment data, while simultaneously helping operators receive payments in a timely manner. In this blog, we'll explore LA Pay’s Request Payment feature and how it can be incorporated into your Custom Forms.
Sending a Payment Request
- Open the Payment Terminal from the Reservation or Invoice.
- Select the ‘Pay With:’ dropdown and choose ‘Request a Payment’ from the list.
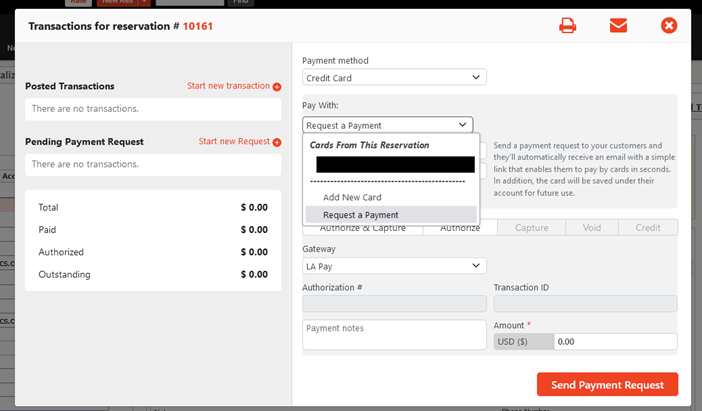
Enter the name and the email address of the person you want to send the payment request to.
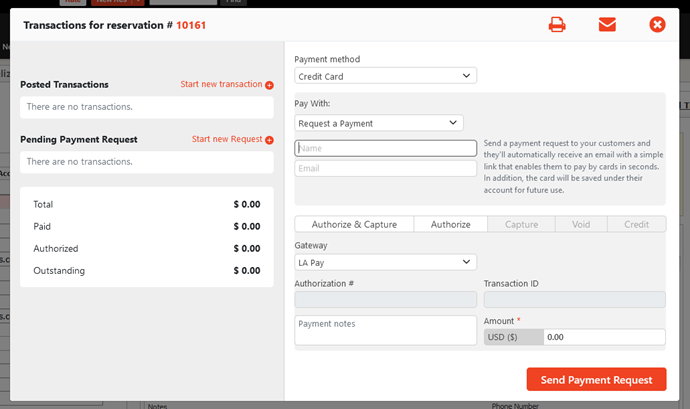
- Select the transaction type (Authorize & Capture or Authorize)
- (Optional) enter notes in the Payment notes field.
- Enter the dollar amount for the transaction.
- Click the ‘Send Payment Request’ button to send an email to the recipient.
Using Customizable Payment Request Forms
For users who prefer custom forms, you now have the ability to create personalized payment request forms for payment requests initiated within a Reservation or Invoice. You also have the option to create forms associated with authorizing payments or authorizing & capturing payments depending on which option best fits your business model.
For further details on creating Custom Forms, please visit our previous blog entry at: Using Custom Forms. We also offer a variety of free templates that you can customize to meet your specific requirements: Free Custom Form Templates.
When creating your new Custom Form, make sure to include the tags associated with the appropriate link.
| #PAYREQUESTLINKAUTHCAPTURE# | Payment Request Link Auth and Capture |
| #PAYREQUESTLINKAUTHONLY# | Payment Request Link Auth Only |
Mapping Your Custom Forms
- Click ‘My Office’ in the Navigation Bar
- Select ‘Messaging & Template Settings’ from the left-hand menu.
- Click ‘Document Mapping’ under the ‘Standard Settings’ tab.
- Set the ‘Use Custom Document Mapping’ dropdown to ‘Yes’ .
- At the bottom of the Custom Forms list, you’ll see four new options: Default Reservation Payment Request (Authorize & Capture), Default Reservation Payment Request (Authorize), Default Invoice Payment Request (Authorize & Capture), and Default Invoice Payment Request (Authorize).
- Select the appropriate Custom Form(s) from the dropdown associated with the form type you created.
- Click ‘Update My Email Templates’ to save updates to the system.
- The new Custom Forms have been mapped all payment requests sent from the system will use the template you created.

If you have any questions or need help designing a custom form or setting custom document mapping, please don't hesitate to reach out to our support team for assistance. Have a suggestion for us? Send an email to ProductTeam@LimoAnywhere.com; your input is important for our continued success.
Recent Posts

When Someone Searches “Car Service Near Me,” Will They Find You?
Wednesday July 29, 2026
A More Proactive Way to Manage Driver and Affiliate Compliance
Wednesday July 22, 2026