Making the Most of the New Dispatch Grid: Optimizing Your Workflow

In our previous blog post, we walked through how to configure your dispatch grid, including how to manage columns, adjust widths, and organize your layout so it reflects how your team works.
In this post, we’ll focus on optimizing your grid for specific parts of your workflow, such as group management, billing, and other day-to-day operational tasks.
If you haven’t configured your grid yet, review the setup guide before using presets and tabs to optimize workflow.
Read the setup guide →
- Create saved filtered views with presets
- Organize presets into tabs for faster access
- Set default views for repetitive daily workflows
- Build practical views for payments, affiliates, VIPs, and vehicle-specific operations
Presets vs. Tabs: When to Use Each
Presets control how the grid is displayed. A preset can include a specific column layout, sorting preferences, and filters, allowing you to focus on a particular set of reservations or operational tasks.
Tabs organize those presets. Each tab can contain multiple presets, giving your team a dedicated space for different types of work while still allowing quick access to multiple grid views.
Example: You might create a tab focused on reservations that still require payment collection, with presets that filter for unpaid trips or reservations approaching pickup that still have a balance due. Another tab might focus on operational tasks, with presets that highlight farm-out trips, reservations for a specific client, or trips booked under a particular alias.
Pro Tip: Use presets when you need a filtered view for a specific task. Use tabs for views your team returns to every day.
How to Build a Preset for Faster Daily Review
Presets allow you to save a filtered view of the dispatch grid so you can quickly focus on a specific set of reservations without rebuilding the same filters each time.
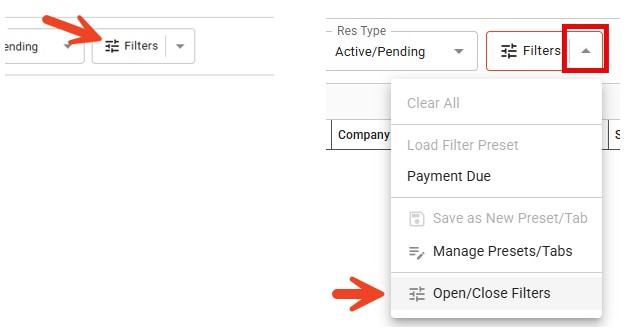
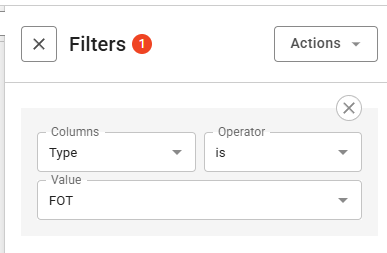
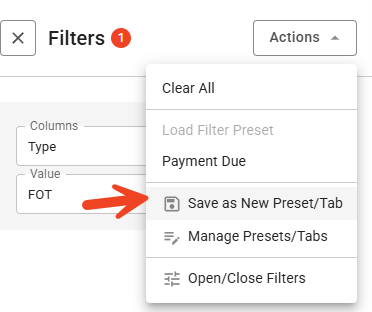
Click the Filters button at the top of the dispatch grid. You can also click the caret next to Filters and select Open/Close Filters. Then choose the field, operator, and value you want to use.
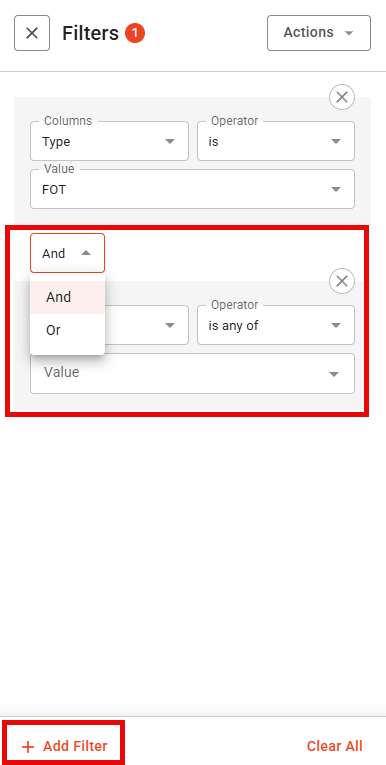
If needed, click + Add Filter to apply additional filters and create a more focused working view.
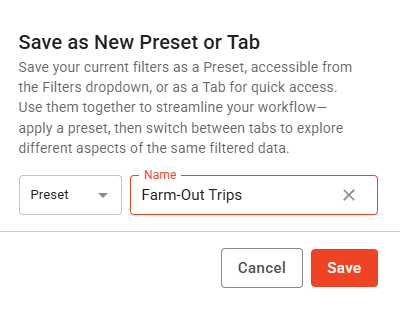
Once your filters are set, click Actions, select Save as New Preset/Tab, choose Preset, enter a name for the preset, and click Save.
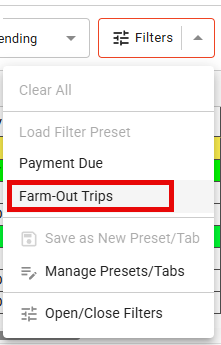
To use the preset later, click the caret next to Filters and select it from the preset list.
How to Organize Your Workflow with Tabs
As you begin creating presets, you may find that certain views are used regularly for reviewing specific parts of your operation. Tabs allow you to keep those views readily available, making it easier to switch between them without searching through the full list of presets.
- Click Actions at the top of the dispatch grid.
- Select Save as New Preset/Tab.
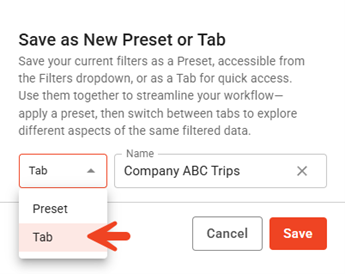
- Choose Tab from the drop-down list.
- Enter a name for the tab.
- Click Save.

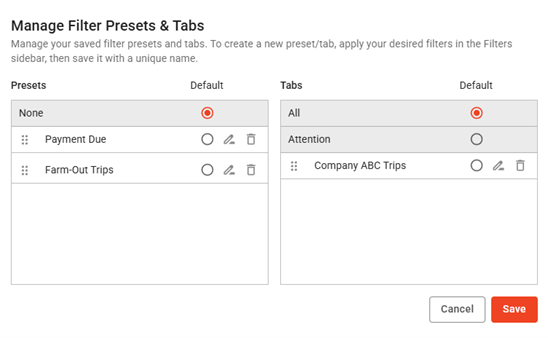
How to Keep Your Grid Organized Over Time
- Click Filter Options at the top of the dispatch grid.
- Select Manage Presets/Tabs.
- Use the radio button to set the default preset or tab that loads when the grid opens.
- Click the pencil icon to edit the name or configuration of an existing preset or tab.
- Click the trash can icon to delete a preset or tab you no longer need.
- Click Save to apply your changes.
Pro Tip: Name tabs by workflow, not by feature. “Payments Due” is more useful than a generic label like “Billing Filter.”
Practical Ways Teams Use Presets and Tabs Every Day
Presets are useful when you want to quickly review a specific set of reservations using filters.
For example, you might create a preset that filters reservations by Status so it is easier to review trips that still require attention. Another preset may focus on Affiliate Name, making it easier to review farm-out trips and confirm affiliate driver or vehicle details.
You might also filter by Vehicle, Driver, or Type to see how trips are distributed for a given day. In other cases, filtering by Company, Passenger Name, or Occasion can make it easier to pull reservations associated with a specific client or event.
Highlight reservations with outstanding balances so your team can quickly identify accounts that still require payment collection.
Filter reservations assigned to affiliate partners so you can review status, confirm affiliate driver or vehicle details, and monitor execution.
Create a dedicated view for important accounts to make service monitoring and team coordination easier.
View all trips assigned to a particular vehicle type to better understand scheduling and utilization.
Best Practices for Building Presets and Tabs
Use names your whole team will understand immediately, especially for recurring workflows.
Create tabs around business tasks like billing, affiliates, or VIP monitoring instead of only around data fields.
If your team starts each day with the same operational review, make that tab the default view.
Remove outdated presets and tabs over time so your grid stays useful and uncluttered.
See how Limo Anywhere helps operators organize reservations, billing, affiliates, and daily workflows in one place.
Recent Posts
A More Proactive Way to Manage Driver and Affiliate Compliance
Wednesday July 22, 2026