Setting Up Child Seat Charges in Limo Anywhere
Offering child seats as an upsell is a simple way to improve the customer experience while increasing revenue. It allows you to clearly present safety options during booking and helps ensure those services are billed consistently.
In this blog, we’ll walk through configuring a multiplier rate in your native Limo Anywhere system. For Addons users, we’ll also cover how to offer child seats as part of the quoting process in Lead Quote Close.
Setting Up a Multiplier Rate in Limo Anywhere
- Click the “My Office” icon in the navigation bar
- Open the “Rate Management” tab
- Select “System Rate Manager” from the left-hand menu
- Click the “Multiplier Rate” tab
- Set the “Rate Group” dropdown to “Miscellaneous”
- Enter a name (Example: “Child Seat Charge”)
- Enter your per-seat price in the “Default Amt” field
- Set the “Multiplier” field to “0”
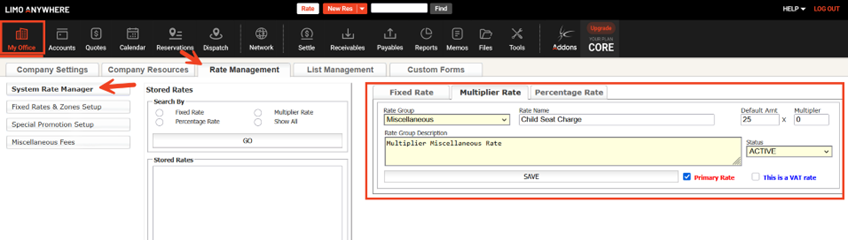
9. Click “Save”
10. Once the rate has been created, click the “Company Settings” tab
11. Select “Company Preferences”
12. Click “Reservations” from the left-hand menu
13. Locate “Populate No. of Child Seats Into Rate Multiplier”
14. Select the rate you just created in the dropdown menu
15. Choose which rate types this applies to under “Applies To”
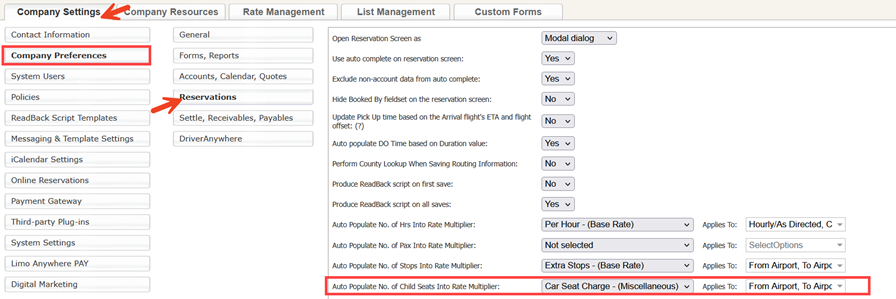
15. Scroll to the bottom and click “Update My Company Preferences” to save changes.
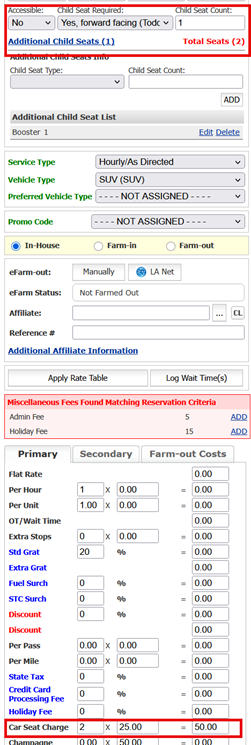
Once configured, the system will automatically calculate the total based on the number of child seats entered on the reservation.
Adding Child Seats in Lead Quote Close
When using Lead Quote Close, you have two ways to control how many child seats a client can request. This is where behavior can vary depending on how your forms are configured.
Option 1: Vehicle-Level Configuration
You can define the number of available seats directly within each vehicle’s configuration. This approach ties availability to your actual fleet and allows LQC to reference that information automatically during the quoting process.
- Go to “Addons”
- Open “Lead Quote Close”
- Select “Vehicle Categories”
- Choose the vehicle category you want to edit
- Locate the child seat field
- Enter the maximum number of child seats allowed for that category
- Click “Save”
8. Open “Contract & Card Capture”
9. Select the gear icon next to the Configuration you want to edit
10. Scroll to the “Capture” select and check “Offer Child Seat Requests”
11. Check “Use Seat Quantity from Vehicle Category Setting” for each seat type you want to offer.
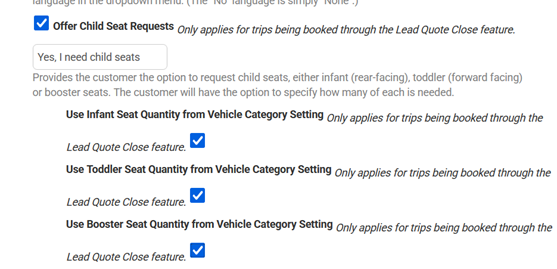
12. Click “Update Configuration for Confirmation & Card Capture” to save changes
Repeat for each configuration you want to update.
Option 2: Contract & Card Capture (Form-Level Configuration)
You can also define the number of child seats directly within the Contract & Card Capture settings for each form.
This gives you more flexibility if you want different limits depending on how the client is booking.
- Go to “Addons”
- Open “Contract & Card Capture”
- Select the gear icon next to the Configuration you want to edit
- Scroll to the “Capture” select and check “Offer Child Seat Requests”
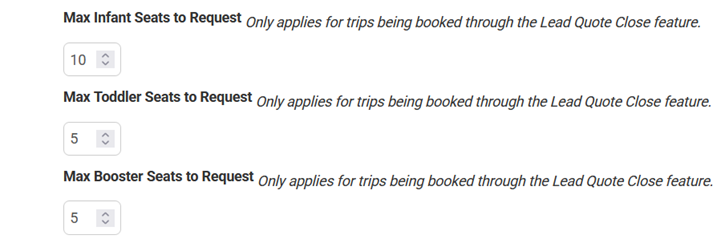
- Enter the max seats to request for each seat type
- Click “Update Configuration for Confirmation & Card Capture” to save changes
- Repeat for each configuration you want to update
Choosing the Right Approach
- Use form-level configuration if your vehicle categories generally support the same number of child seats and you want a consistent limit across the form
- Use vehicle category configuration if different vehicles have different capacities, including vehicles that cannot accommodate child seats at all
NOTE: If both are configured, the form-level setting can override what’s defined at the vehicle category level and vice versa. It’s a good idea to test your form to confirm which value is being applied.
Recent Posts

A More Proactive Way to Manage Driver and Affiliate Compliance
Wednesday July 22, 2026