Customizing Your Lead Form
Customizing Your Lead Form
In a previous blog post, we covered how to install the Embed Code on your website and use the "Embeds" section of Lead Quote Close to determine which Lead Form should appear on a specific page.
Once your Lead Form is displaying, you can further customize how it fits within that page. Lead Quote Close provides additional options for controlling where the form appears, how it expands during the quoting process, and how it looks.
Some of these settings involve your website's layout. If you aren't comfortable making changes to your website, the person or company that manages it can help you identify the information you need.
Choosing Where the Form Appears on the Page
The "Inner Element ID" tells Lead Quote Close where on the page you want the Lead Form to appear.
Most webpages are divided into different sections. Those sections can have unique IDs that allow Lead Quote Close to identify where the form should be displayed.
For example, your website might include:
<div id="lead_form"></div>
In this example, you would enter:
lead_form
in the "Inner Element ID" field.
The "Inner Element ID" is optional. If you aren't sure whether your website has an ID you can use, your website developer can identify one or create a new section specifically for the Lead Form.
Keep in mind that if you select an existing section, the Lead Form will replace anything already inside it. If that section contains content you want to keep, a new, empty section should be created for the form instead.
Allowing the Form to Expand
The "Outer Selector" tells Lead Quote Close how much of the page the Lead Form can use as a customer moves through the quoting process.
The first step of your Lead Form may only need a small amount of space. As the customer continues, the form may need more room to display vehicles, pricing, and other information.
For example, if the larger section of your website is identified as:
<div id="quote_section">
you would typically enter:
#quote_section
in the "Outer Selector" field.
An easy way to think about these settings is:
- The "Inner Element ID" tells Lead Quote Close where the form starts.
- The "Outer Selector" tells Lead Quote Close how much space the form can use as it expands.
The "Outer Selector" needs to include the section being used for the "Inner Element ID." If you aren't sure what to enter, your website developer can help identify the appropriate value.

Matching the Lead Form to Your Website
You can also use custom CSS (Cascading Style Sheets) to change how your Lead Form looks.
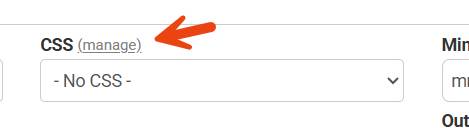
CSS is simply code used to control the appearance of a website. For example:
button { background-color: blue; }
This tells the website to make the background of its buttons blue.
You don't need to know how to write CSS to use a Lead Form. The important thing to know is that CSS can be used to customize things such as:
- Fonts
- Colors
- Backgrounds
- Spacing
- Buttons
- The placement or visibility of certain form elements
For example, you could use CSS to make the buttons on your Lead Form match the colors used on the rest of your website.
Custom CSS is completely optional. If you're happy with how your Lead Form already looks, you don't need to make any changes.
Applying CSS to Your Lead Form
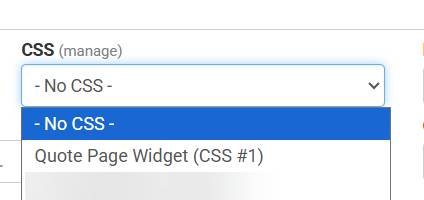
Once your custom CSS has been created, make sure it is associated with the appropriate Lead Form Configuration.
From the Lead Form Configuration, locate the "CSS" dropdown and select the stylesheet you want the form to use. If "- No CSS -" is selected, the custom stylesheet will not be applied to that Lead Form.
If you have multiple Lead Forms, you can select the appropriate CSS for each configuration based on how you want that form to appear.
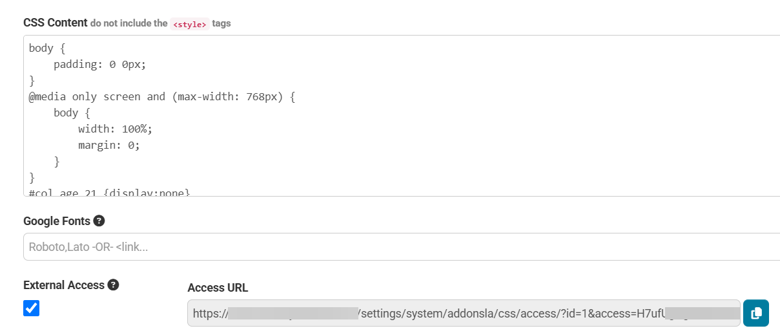
Providing CSS Access to a Developer
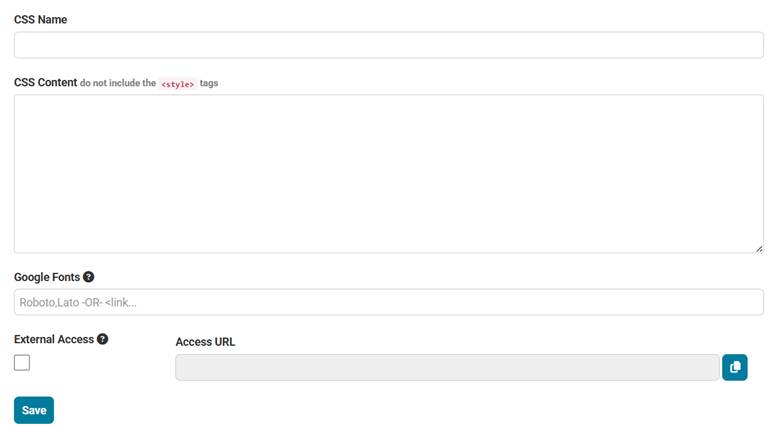
If someone else manages your website or is helping you customize your Lead Form, you don't need to give them access to your entire Addons account.
External Access can be enabled for the applicable CSS file. This provides a separate link they can use to make changes to the stylesheet without accessing the rest of your account.
Once their work is complete, External Access can be disabled.
Testing Your Customizations
After making changes, test your Lead Form from beginning to end to make sure everything still looks and works the way you expect.
Check that:
- The Lead Form appears in the correct location
- Existing content hasn't unexpectedly disappeared
- The form has enough room as it expands
- Vehicles and pricing display correctly
- Text and buttons are easy to read and use
- Any custom colors or styling appear correctly
- The form works on both a computer and a mobile device
It's especially important to check your website on a phone. Something that looks good on a computer may display differently on a smaller screen.
The "Inner Element ID," "Outer Selector," and custom CSS give you additional control over how your Lead Form fits into your website, but they aren't required. If your Lead Form already looks and works the way you want after completing the basic Embed setup, you may not need to make any additional changes.
Every operator’s website is a little different, so your Lead Form may require some adjustments to fit your existing layout. If you have questions about the Lead Quote Close settings available for your implementation, contact Support at 972-701-8887 x2 or support@limoanywhere.com. Interested in adding Lead Quote Close to your account? Contact Sales at 972-701-8887 x1 or sales@limoanywhere.com.
Recent Posts

Why Customers Still Call Instead of Booking Online
Friday September 18, 2026
See Limo Anywhere Plus & Black in Action: Webinar Replay
Thursday September 17, 2026