Port Authority Access Fee
On April 5th, 2021, the Port Authority of New York & New Jersey (PANY/NJ) will be implementing an “airport ground transportation access fee” for Taxi and For-Hire Vehicle (FHV) passengers.
Passengers using FHVs will pay a $2.50 fee for airport pick-ups and drop-offs at the following airports:
- John F. Kennedy International Airport (JFK)
- LaGuardia Airport (LGA)
- Newark Liberty International Airport (EWR)
For Black Car Permittees, for every passenger pick-up or drop-off, the FHV Driver must possess the paper or electronic equivalent of a waybill that should include:
- The Permittee name and Port Authority issued Permit number
- The name of the FHV Driver
- The FHV Motor Vehicle license plate number, make and model
- The airport pick-up or drop-off location
- Date and time of airport pick-up or drop-off
- Transaction type (pick-up or drop-off)
Also will need a quarterly report of all EWR, LGA, and JFK airport pick-ups and drop-offs.
There are a few ways you can set these up in Limo Anywhere. We are going to give you some examples so you can make sure your company is charging this fee, including this information on trip sheet and/or scheduled message, and generating the report you need.
Setting up the Access Fee
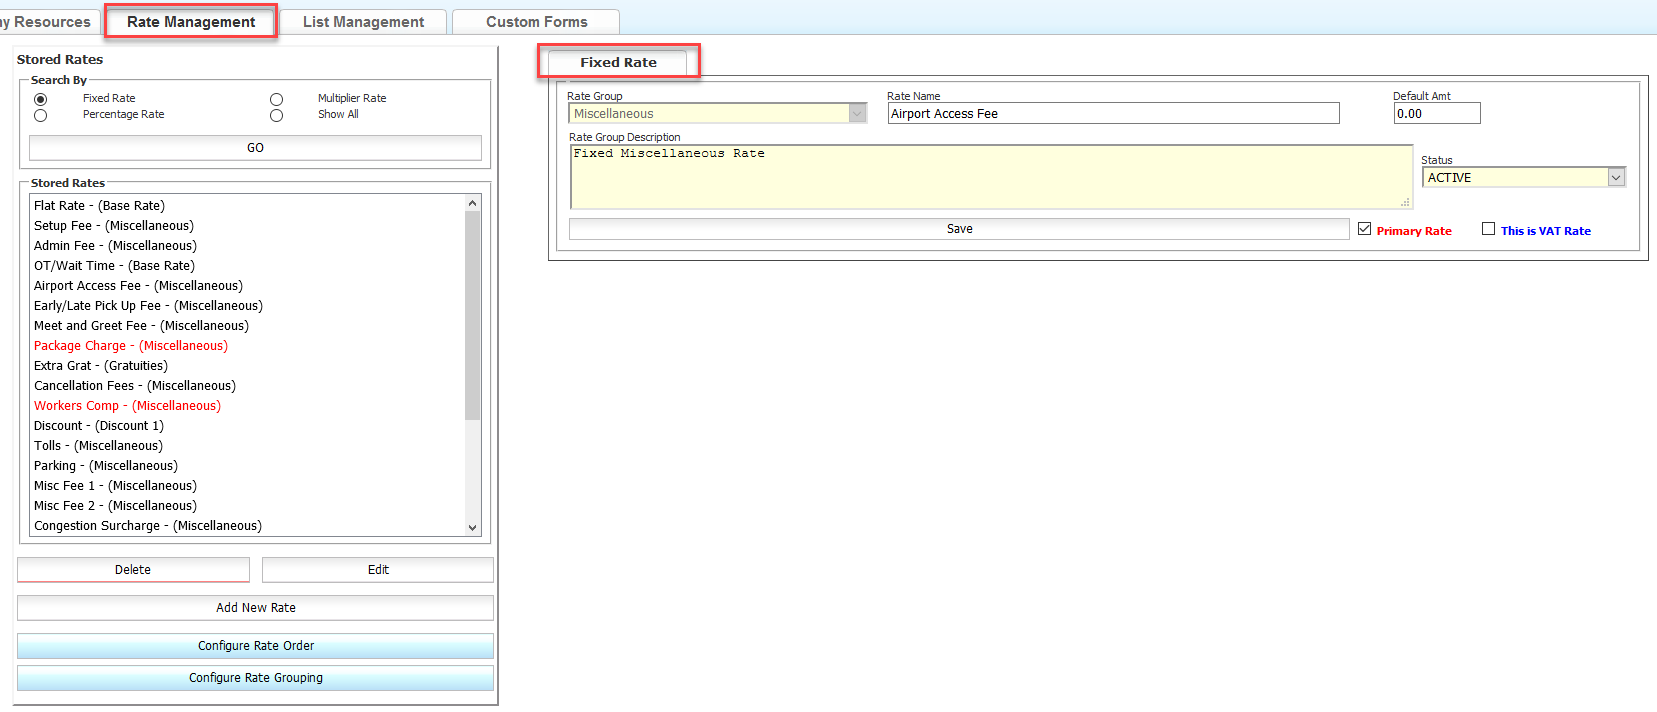
Now you can add this access fee into your Fixed Rates on your JFK, LGA, and EWR rates, but using Criteria Based Fees is probably the easiest way to implement this fee.
- Make sure that you have a Rate Line Item in your System Rate Manager that can be used for this fee. If you need to create one:
- Go to My Office>Rate Management>System Rate Manager
- On right hand side, make sure the “Fixed Rate” tab is selected
- Select the Rate Group (make sure to select the correct rate group depending on how you need it to calculate based on other taxes or surcharges)
- Enter in the Rate Name
- Leave the Default Amt as 0.00 because you will not be charging on every reservation
- Click Save
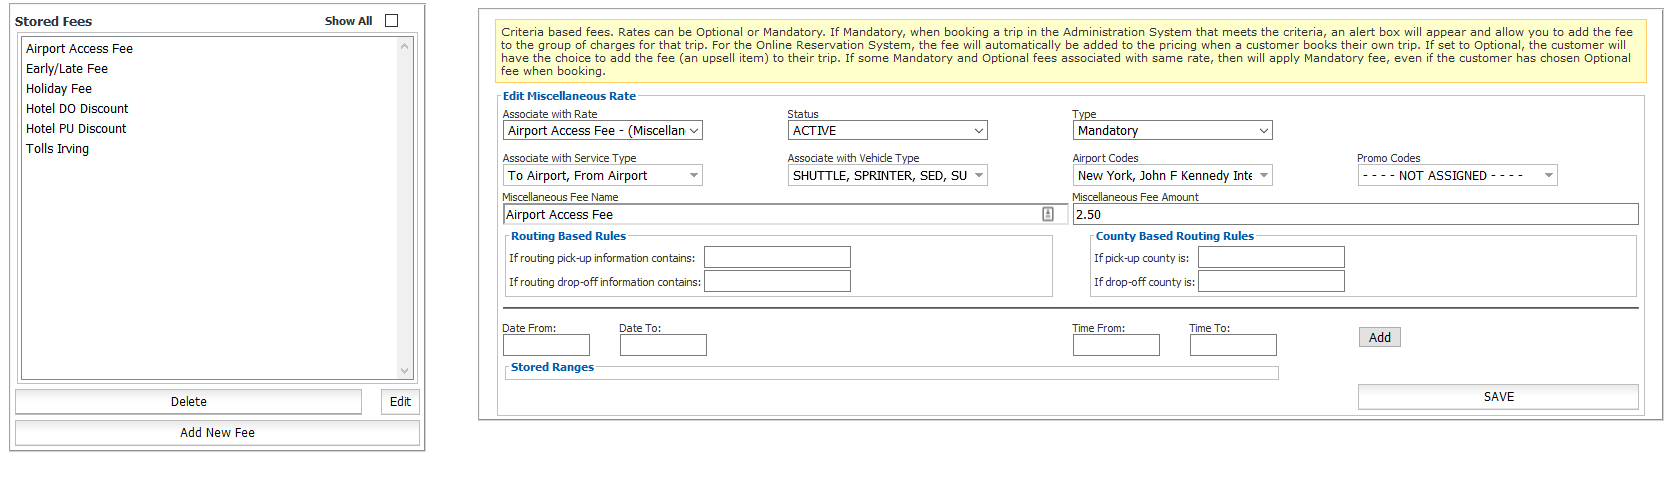
- Go to My Office>Rate Management>Miscellaneous Fees
- On right hand side, select the newly created rate or existing rate you want this fee to associate with
- Status is “ACTIVE”
- Type is “Mandatory”
- Select your Airport Service Type(s) under “Associate with Service Type”
- Select ALL or your airport Vehicle Types under “Associate with Vehicle Type”
- Select JFK, LGA, and EWR under “Airport Codes”
- Type in the Miscellaneous Fee Name (this can be same as the rate name)
- Miscellaneous Fee Amount is $2.50
- Click Save
Check out our articles on System Rate Manager and Criteria Based Fees for more information on setting these up.
Setting up a Custom Waybill and/or Schedule Message
Limo Anywhere’s current Driver Trip Sheet that is included and DriverAnywhere both contain most of the information needed to display on the waybill. However, you can create a new Custom Form that you can send out to your drivers for a trip manually and/or set up a scheduled email to go out to the driver at a certain point in the trip.
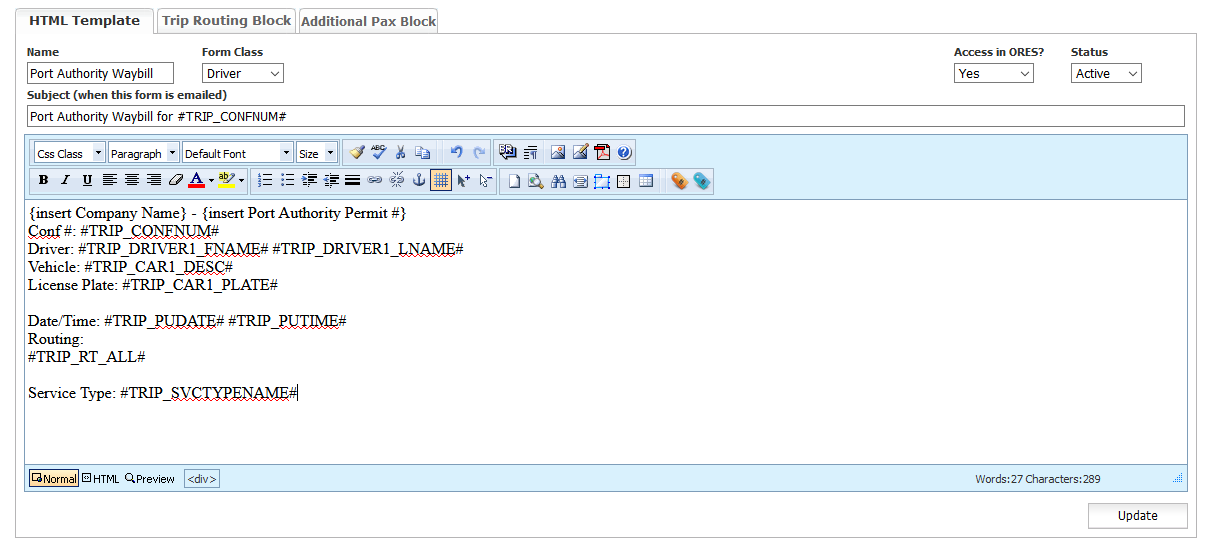
To set up a Custom From:
- Go to My Office>Custom Forms tab
- On the right hand side, enter in the Name of the form
- Form Class is “Driver”
- Enter in the Subject that will display as subject of email
- Enter in the body of the form the details you want to display on the form (using dynamic tags to pull information from the reservation)
- Click Save
Example Custom Form:
Subject: Port Authority Waybill for #TRIP_CONFNUM#
Body:
{insert Company Name} - {insert Port Authority Permit #}
Conf #: #TRIP_CONFNUM#
Driver: #TRIP_DRIVER1_FNAME# #TRIP_DRIVER1_LNAME#
Vehicle: #TRIP_CAR1_DESC#
License Plate: #TRIP_CAR1_PLATE#
Date/Time: #TRIP_PUDATE# #TRIP_PUTIME#
Routing:
#TRIP_RT_ALL#
Service Type: #TRIP_SVCTYPENAME#
See our article How-to Build a Custom Form for more information.
Note: If using the example above make sure, your Cars in Fleet have the Make and Model in the “Car Description”.
To set up a Scheduled Email
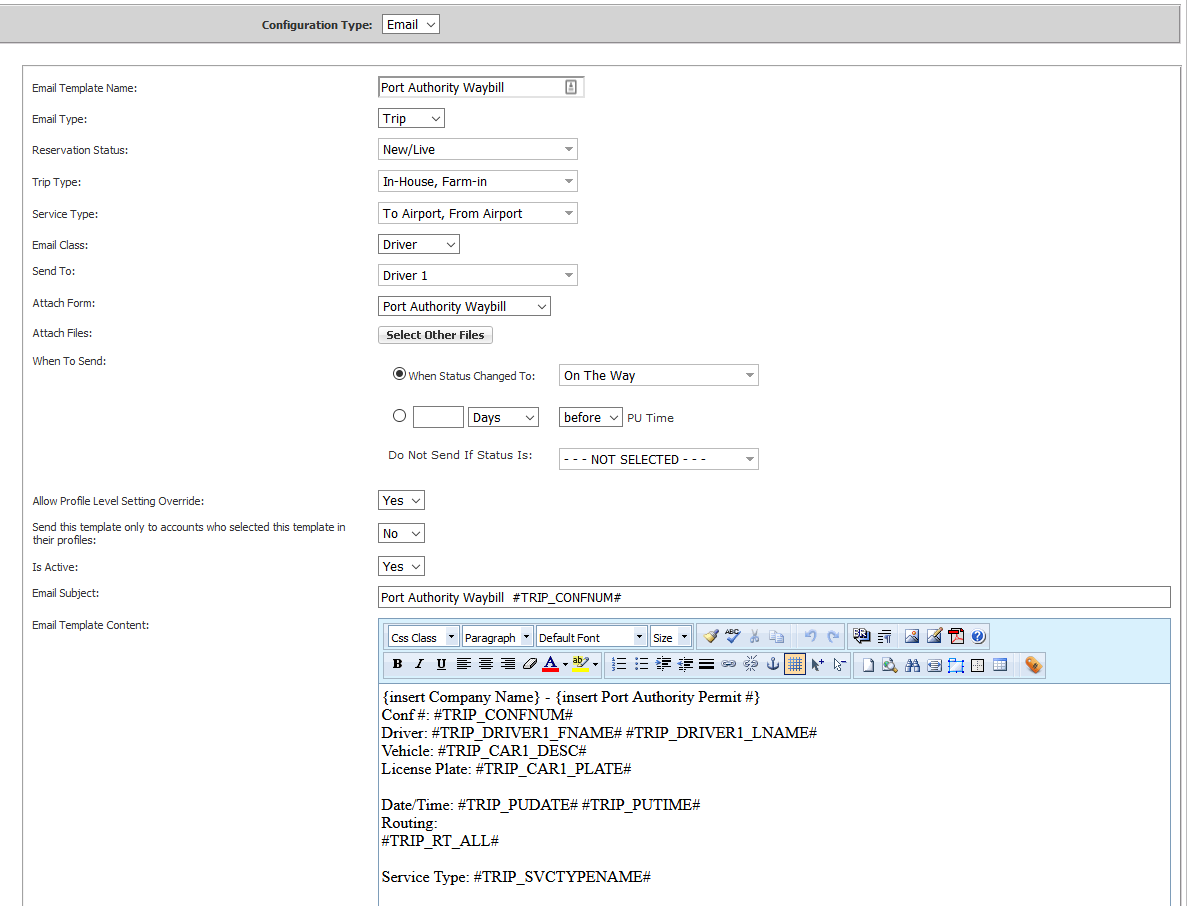
- Go to My Office>Messaging & Template Settings>Scheduled Messaging tab
- Enter in Email Template Name
- Email Type is “Trip”
- Reservation Status is “New/Live”
- Select “In-House” and “Farm-in” as Trip Type
- Select your airport Service Types as Service Type
- Email Class is “Driver”
- Select “Driver 1” and/or “Driver 2” as Send To:
- (Optional) Attached Form or Files (if created a Custom From above you can attach that form)
- Set up When To Send:
- Select the status you want to send the scheduled email in When Status Changed To:
or - Set up time based schedule to send at certain time before PU Time
- Select the status you want to send the scheduled email in When Status Changed To:
- Allow Profile Level Setting Override is “Yes”
- Send this template only to accounts who selected this template in their profiles: is “No”
- Is Active is “Yes”
- Enter in the Email Subject
- Enter in the body the details you want to display on the email (using dynamic tags to pull information from the reservation)
- Click Save
Example Scheduled Email:
Subject: Port Authority Waybill for #TRIP_CONFNUM#
Body:
{insert Company Name} - {insert Port Authority Permit #}
Conf #: #TRIP_CONFNUM#
Driver: #TRIP_DRIVER1_FNAME# #TRIP_DRIVER1_LNAME#
Vehicle: #TRIP_CAR1_DESC#
License Plate: #TRIP_CAR1_PLATE#
Date/Time: #TRIP_PUDATE# #TRIP_PUTIME#
Routing:
#TRIP_RT_ALL#
Service Type: #TRIP_SVCTYPENAME#
See our article How-to Create a Scheduled Email Template for more information.
Note: If using the example above make sure, your Cars in Fleet have the Make and Model in the “Car Description”.
Using these options should ensure that you are correctly applying the Port Authority Access Fee and displaying the information on the waybill that is required.
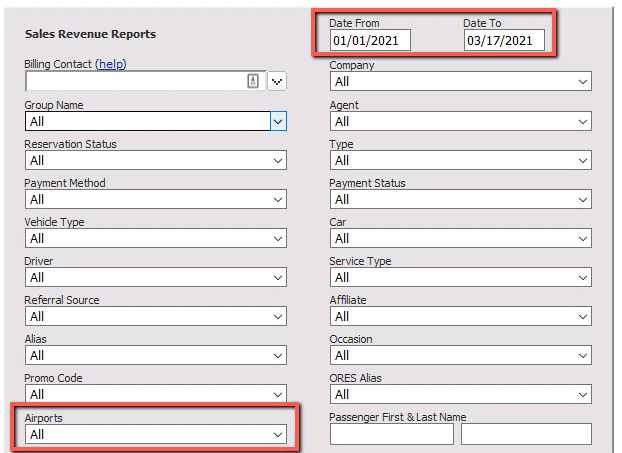
Running a Report for Each Airport
To see your airport runs for each airport, you will need to run a Sales Revenue Report with the airport specified.
- Reports > Sales Revenue Reports
- Establish your date range.
- Choose either EWR, LGA or JFK in the ‘Airports’ dropdown menu.
- Choose the output format: Web Page or MS Excel (Web Page allows you to print each report to PDF or Excel allows you to combine each report into one report in Excel)
- Click ‘Generate Report’
NOTE: You will need to run each airport individually.
IMPORTANT: Please check with your Port Authority for requirements and any additional information you may need.
Recent Posts
GroundXchange Self-Registration Is Now Live in Limo Anywhere
Wednesday February 18, 2026
CD/NLA Vegas 2026: Your Operator Game Plan for March 1–3 at MGM Grand
Wednesday February 18, 2026