Linking Rate Matrices to Service Types in ORES
While default pricing may work for the majority of your daily operations, there may also be times of year where you want to plan for different pricing models without making it difficult for your clients to book their service online.
Some examples where you might want to employ different rates include:
- Pricing for a unique event like the Super Bowl or other high-profile events.
- Pricing for specific destination/events like major arenas or concert venues.
- Certain Service types that require different pricing like Proms
- Apply higher or lower rates to account for seasonality. A summer vacation market could easily change rates to account for decreased demand in off peak months.
One of the ways that you can differentiate your pricing in ORES is by associating a rate matrix with a particular service type. This will enable you to scale pricing up and down as the time of year or demand change.
**If your zones are already configured, you can skip to ‘Setting Up a Fixed Rate Matrix’ or ‘Setting Up an Hourly Rate Matrix'”
Setting Up Zones
- Click on ‘My Office’.
- Under the ‘Rate Management tab select ‘Fixed Rates & Zone Setup’.
- Click the ‘…’ button to the right of the From and To fields in the Add New Rate box.
- The ‘Manage Zones’ pop-up window will open.
- The first zones that need to be added are for all commercial airports that will be in the company’s Fixed Rate & Zones structure to establish those airports as zones.
- In the ‘Add New Zone’ section enter the FAA Airport Code as the Zone Code.
- It is important that the FAA Airport Code be used because those are built into Limo Anywhere. Do not enter a Zone City or Zip Code for an airport.
- Enter the name of the airport in the field Zone Description.
- Click ‘Add Zone‘ to save changes.
- Click on the blue arrow icon to create additional zones.
- The next step is to establish the geographic areas that will define the Zones. Each zone must have a unique Zone Code.
- Adding the Cities and Zip Codes to the Zone is optional the Fixed Rates will function much better if that information is included.
- Helpful Hint: a zone can be as small as a single zip code or as large as an entire metropolitan area. The smaller the geographic size of the zone the more zones there will be. A good place to start is to obtain a zip code map of your service area so that the zones can be visualized. There are many free sources for these available online.
Setting Up a Fixed Rate Matrix
- Click on ‘My Office’.
- Under the ‘Rate Management tab select ‘Fixed Rates & Zone Setup’.
- Click ‘Create New Rate Matrix’
- In the pop-up, enter a unique name for your rate matrix and click the ‘Create Matrix’ button.
- Select the ‘From Zone‘ from the drop-down list.
- Select the ‘To Zone‘ from the drop-down list.
- Select the ‘Vehicle Type‘ from the drop-down list.
- Enter the amount of the rate in Rate($).
- Enter amounts for Tolls and Parking if appropriate for this rate.
- Enter percentage values for the Tax 1 and Tax 2 fields if appropriate to this rate.
- Click the check box for ‘Create a Reversed Rate‘ if it is desired to create a rate reversing the From/To Zone automatically.
- Click ‘Add Rate‘ to save changes.

Mapping Fixed Rate Fields
- Under the ‘Rate Management tab select ‘Fixed Rates & Zone Setup’.
- Select the Rate Matrix you would like to map fields for.
- Click the ‘Map Fixed Rate Fields’ button.
- Select the appropriate item from the drop-down to associate with your fields.
- Click ‘Update’ when you are finished to save changes.

Setting Up an Hourly Rate Matrix
- Click on ‘My Office’.
- Under the ‘Company Resources’ tab select ‘Vehicles’.
- In the Vehicle Type Listing click ‘Edit Vehicle Type’
- Navigate to the ‘Rates’ tab
- Under the ‘Per Hour Rates’ tab click ‘Add New Rate Matrix’
- The ‘Create New Rate Matrix’ pop-up will open
- Enter a unique name for your new Rate Matrix and click the ‘Create Matrix’ button.
- Enter the rate per hour for your Standard Rate.
- Select the Minimum Hours for the Standard rate from the drop-down list.
- Enter the rate per hour for Peak Rate.
- Select the Minimum Hours for the Peak rate from the drop-down list.
- For the Standard and Peak Rates, select from the drop down list the rate it will be associated with.
- This will determine where the rate will appear in a the rate breakdown area of a reservation. The default selection is Per Hour (Base Rate).
- Select the days and enter the hours for which the Peak Rate will apply in Peak Rate Schedule.
- Click ‘Update Vehicle Type Rate‘ to save changes.

How to Map a Rate Matrix to a Service Type
- Click on ‘My Office’
- Under the ‘Company Settings’ tab select ‘System Settings’
- Select ‘Service Types’
- Click the name of the Service Type.
- Once clicked a pop-up window will be displayed so that a rate matrix other than default can be selected.
- When selected that new matrix will apply.
- If nothing is changed here the default rate matrix will apply
- To choose whether the Service Type is visible in ORES, toggle the ‘Visible in ORES’ setting.
As always, if you have questions or need further assistance, please reach out to Support at 1-888-888-0302 x2.
Recent Posts
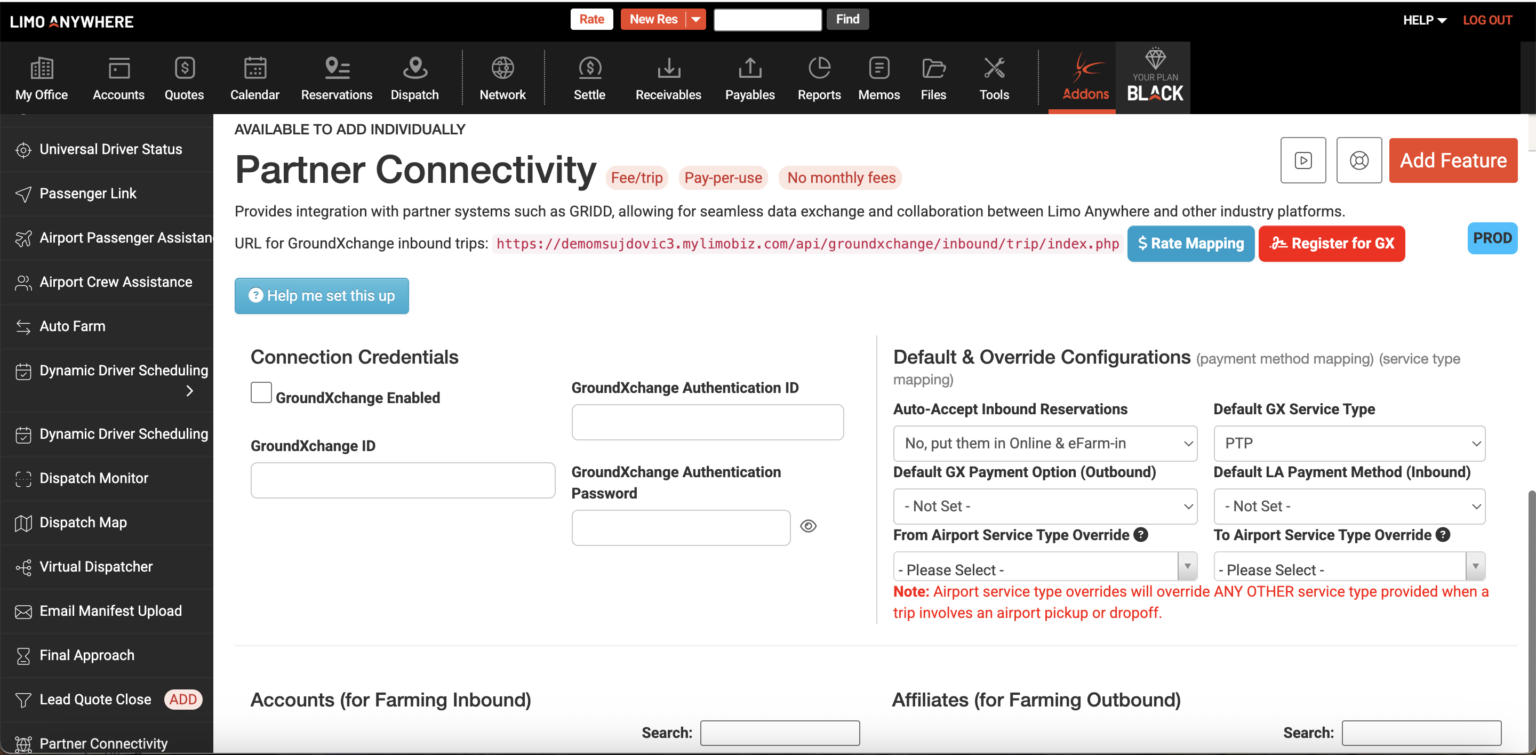
GroundXchange Self-Registration Is Now Live in Limo Anywhere
Wednesday February 18, 2026
CD/NLA Vegas 2026: Your Operator Game Plan for March 1–3 at MGM Grand
Wednesday February 18, 2026