Choosing and Configuring the Right Lead Form
Choosing and Configuring the Right Lead Form
Lead Forms in Lead Quote Close allow you to collect detailed trip information from customers through your website. Depending on your system’s configuration, they can also provide immediate quotes, track lead sources, apply pricing rules, and prevent certain vehicles or service requests from being automatically quoted.
Over this three-part blog series, we’ll take a closer look at choosing and configuring a Lead Form, adding it to your website, and troubleshooting common implementation issues.
Start With the Purpose of the Form
Before creating a Lead Form Configuration, consider where the form will appear and how much the customer is likely to know about their trip. Someone requesting airport transportation may have all their trip details, while a customer planning a wedding or multi-day event may still be finalizing their itinerary.
The form should collect enough information for your team to understand the request without requiring details that may not yet be relevant or available.
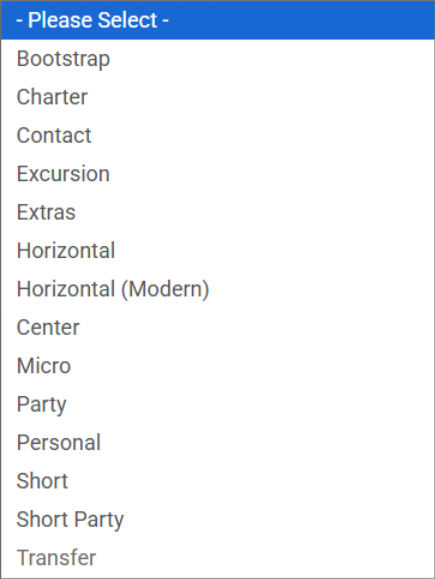
Some of the available form types include:
- Micro Form: A compact form intended for areas with limited space, such as a homepage quote widget
- Center Form: A larger, visual form designed to serve as a primary quoting feature on a webpage
- Contact Form: A flexible option for general inquiries or customers who may not have complete trip information
- Short Form: A straightforward form that collects common point-to-point trip details
- Party Form: A form intended for hourly or event-related service
- Charter Form: A form designed for more complex, multi-stop, or multi-day requests
Different forms collect different information and may display differently on the page. Selecting the appropriate form helps ensure customers are being asked for details that match the type of service they need.
Consider Where the Form Will Be Used
The same Lead Form may not be appropriate for every page on your website.
A Micro Form may work well on a homepage because it provides a compact way to begin the quoting process. A larger Center Form may be more appropriate on a dedicated reservations or “Request a Quote” page.
You may also choose to create separate Lead Form Configurations for:
- Airport transportation
- Weddings
- Proms
- Corporate travel
- Group transportation
- Hotel or venue partners
- Seasonal promotions
- Advertising campaigns
These configurations can use the same form type while applying different settings based on where the form appears or who it is intended to serve.
For example, your general website and a wedding landing page may both use the Center Form. However, the wedding configuration could be connected to a specific promotion, use different customer-facing headings, or be included in pricing and Auto-Quote Blocking rules created specifically for wedding requests.
Configuring Your Lead Form
After selecting a form type, review the available configuration settings. The options displayed may vary depending on the form you choose.
Depending on the form, you may be able to configure:
- Minimum and maximum booking dates
- Personal Information and Vehicle List headings
- How per-unit pricing is displayed
- Whether pennies are shown in quoted prices
- Edit and Update Request button labels
- An assigned Promo
- An assigned Agent
- A Company Location
- The Account used for the request
- Whether the form should force automatic quoting
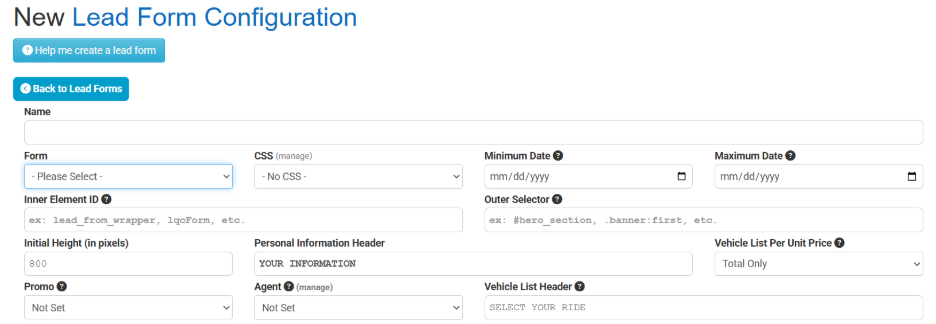
These settings help ensure that requests submitted through the form are connected to the appropriate pricing, account, location, or follow-up process.
For example, a form created for a limited promotion may include an assigned Promo and booking-date restrictions. A form created for a hotel partner may be connected to a particular Agent, Company Location, or Account.
Using Lead Form Configurations With Selection Factors
A Lead Form Configuration can also be used as a Selection Factor.
The “Lead Form Configuration Used” factor allows you to create rules based on the specific form submitted by the customer.
Depending on your setup, this may be used to:
- Apply campaign-specific pricing
- Restrict requests to eligible dates
- Control which rates are returned
- Require manual review for certain requests
- Apply an Auto-Quote Blocking policy to a temporary or specialized form
For example, you may create a Lead Form for a wedding expo and connect it to a promotion available for a limited period. You could then use the Lead Form Configuration Used factor to make sure the appropriate pricing or restrictions are applied to requests submitted through that form.
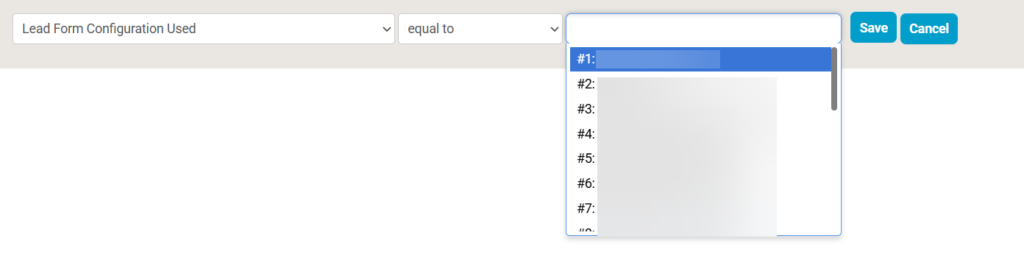
Creating separate configurations gives you more control than directing every customer through the same general form.
Reviewing the Form Before Implementation
Before adding the Lead Form to your website, review the complete configuration and confirm that it matches the form’s intended use.
Consider:
- Whether the selected form collects the information your team needs
- Whether the form is appropriate for the space available on the webpage
- Whether the correct Promo, Agent, Company Location, and Account are assigned
- Whether minimum or maximum booking dates are needed
- Whether the form should force automatic quoting
- Whether any Selection Factors or Auto-Quote Blocking policies should apply
Taking the time to review these settings can help reduce incomplete requests, incorrect pricing, and unnecessary manual follow-up.
In the next part of this series, we’ll review how to add a Lead Form to your website using the provided Embed Code, including how the Inner Element ID and Outer Selector control where the form appears and how it expands.
For help setting up your Lead Forms, contact Support at 972-701-8887 x2 or support@limoanywhere.com. To discuss upgrading your current Limo Anywhere tier or adding Lead Quote Close to your account, contact Sales at 972-701-8887 x1 or sales@limoanywhere.com.
Recent Posts

Why Customers Still Call Instead of Booking Online
Friday September 18, 2026
See Limo Anywhere Plus & Black in Action: Webinar Replay
Thursday September 17, 2026