Adding a Lead Form to Your Website
In the first blog post of this series, we reviewed how to choose a Lead Form and configure it based on where it will be used, the information your customer is likely to have, and the quoting rules that should apply.
Once the configuration is complete, the next step is connecting the Lead Form to your website. Lead Quote Close provides the Embed Code needed to make that connection, along with the ability to control which Lead Form appears on different pages of your website directly from Addons.
Understanding How the Lead Form Works
Lead Forms are created and managed within Addons. Similar to adding ORES to your website, Lead Quote Close uses an Embed Code to connect the tools you've configured in Addons to your website. Lead Forms provide additional customization options and allow you to use the pricing and quoting logic configured within Addons.
The Embed Code is a small piece of JavaScript that can be installed across your website, ideally within a shared area such as your header, footer, or another template that appears on every page. Once installed, the same code can be used throughout your site without adding a separate Embed Code each time you want to display a Lead Form.
Instead, you control what appears on each page from the "Embeds" section of Lead Quote Close. Each Embed configuration associates a specific website URL with the Lead Form you want to display on that page. The Embed Code recognizes the page a customer is visiting and displays the appropriate Lead Form based on your configuration in Addons.
Using the Embed Code also allows you to:
- Manage which Lead Form appears on a page from within Addons
- Make future changes without updating the Embed Code on your website
- Use the pricing and quoting logic configured within Addons
- Add an AI Chatbot to the same page, where applicable
- Preserve available advertising and lead-source tracking across your website
Because the Embed Code can be installed throughout your website, it can also track advertising clicks on pages that don't display a Lead Form or Chatbot. This allows available attribution to follow visitors as they move through your website before eventually submitting a lead or booking.
Locating the Embed Code
The Embed Code is available directly from the main "Embeds" page within Lead Quote Close.
To locate it:
- Log into Addons.
- Navigate to "Lead Quote."
- Select "Embeds."
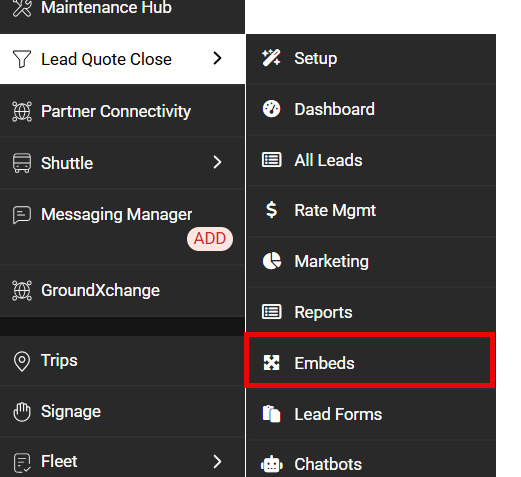
- Copy the Embed Code displayed near the top of the page using the copy button.
The same Embed Code can be installed across your website and does not need to be recreated for each Lead Form or webpage.
Whenever possible, the code should be installed in a shared area of your website, such as the header, footer, or another template that loads on every page. If someone else manages your website, you can provide them with the Embed Code and ask that it be installed site-wide.
Adding the Embed Code to Your Website
Once you've copied the Embed Code, it needs to be added to your website.
The exact process will depend on how your website is built. If you're comfortable managing your website, the code can be added to a shared header, footer, master page template, or another common area that loads across the site. If someone else manages your website, you can provide them with the Embed Code and ask that it be installed site-wide.
If your website already uses Google Tag Manager, the Embed Code can also be deployed through your existing container.
Once the code has been installed, you generally won't need to return to your website each time you want to change which Lead Form appears on a page. Those changes can be managed directly within Addons.
Connecting a Lead Form to a Page
With the Embed Code installed, the next step is telling Addons which Lead Form should appear on each applicable page.
To configure an Embed:
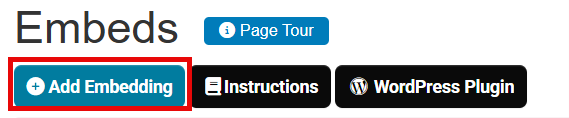
- Navigate to "Lead Quote" and select "Embeds."
- Click "Add Embedding" to create a new Embed or select the gear icon to edit an existing one.
- Enter the exact URL where you want the Lead Form to appear.
- Select the appropriate Lead Form from the "Form" dropdown.
- If applicable, select a Chatbot to display on the page.
- Click "Save" to activate the configuration.
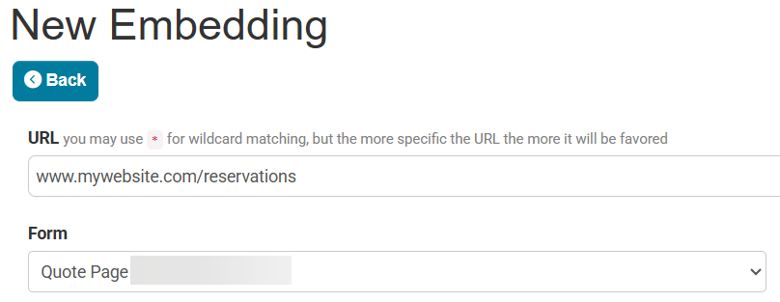
This allows the same Embed Code to serve different Lead Forms on different pages of your website. For example, you could display one Lead Form on your airport transportation page and another on your wedding transportation page, with each configured for the type of request a customer is likely to make.
Using the Correct URL
The URL entered in your Embed configuration must match the page where you want the Lead Form to appear.
Even small differences can prevent the Embed from loading. For example, these would be treated as different URLs:
yourcompany.com/wedding-transportation
yourcompany.com/wedding_transportation
yourcompany.com/weddingtransportation
The easiest way to make sure you're using the correct URL is to visit the page on your website and copy the address directly from your browser's address bar.
It's also important to pay attention to whether your website uses "www." A configured URL without "www" will not match a page that loads with "www" in the address.
Testing Your Lead Form
Once the Embed Code has been installed and your Lead Form has been assigned to the appropriate URL, visit the page and confirm that the form appears.
Don't stop at the first screen. Complete a test request from beginning to end to make sure the entire quoting process is working as expected.
Confirm that:
- The Lead Form appears on the intended webpage
- The correct Lead Form Configuration is displayed
- You can move through each step of the quoting process
- The requested vehicles and pricing display as expected
- The completed request appears in Lead Quote Close
- Any expected lead-source or campaign information is captured
- The form works on both desktop and mobile devices
Once your Lead Form is displaying and accepting requests, you can further customize how it fits within your website. In the next blog in this series, we'll look at some of the additional options available for controlling where your Lead Form appears, how it expands during the quoting process, and how you can use custom CSS to better match the rest of your website.
For help implementing a Lead Form on your website, contact Support at 972-701-8887 x2 or support@limoanywhere.com. To discuss upgrading your current Limo Anywhere tier or adding Lead Quote Close to your account, contact Sales at 972-701-8887 x1 or sales@limoanywhere.com.
Recent Posts

Why Customers Still Call Instead of Booking Online
Friday September 18, 2026
See Limo Anywhere Plus & Black in Action: Webinar Replay
Thursday September 17, 2026